Tag: Revit

  • Revit Mental Ray Renderings in Design Development

    In the “old” days of architecture, the Architect, a skilled artist in his own right, would sketch a perspective view of a room or the building as a whole early on in design process.  As the concepts and visions evolved these sketches were revised or redrawn numerous times.   This combined with a mountain of floor plans sketched on trace paper allowed the client to have a rough idea of what the building would look like at many points in the design process.

    Fast forward to the computer age and the AutoCad revolution in the 90’s.  During the last decade architects have relied less and less on perspectives and more on the more easily produced plans and elevations.  Renderings were only done once the design was nearing completion because the cost of producing high quality computer graphics was prohibitive to a multitude of revisions.  Our clients, more often than not, were expected to interpret the floor plans, site plans, and elevations.  Often times the draftsmen themselves didn’t fully understand how the building was going to look, let alone how all the pieces worked together in three dimensional space.

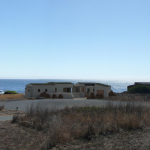
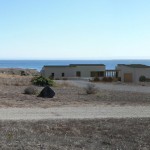
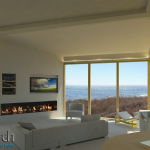
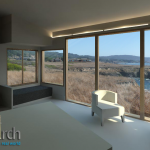
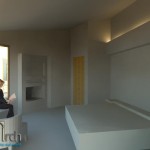
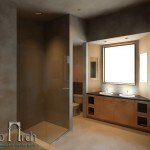
    Today we have Revit with the easy to use Mental Ray rendering engine and a 3d model of the building at our fingertips at all points in the design process.  Below are a few shots of a design I’ve been working on.  The project has gone through numerous revisions and it’s relatively easy to create a new rendering after every change, not to mention the almost constant use of the non rendered 3d model.  Since all of the topo and site data are in the Revit model I can place my camera at the exact location where the real world contextual photographs were taken resulting in some fairly accurate results in a short amount of time.  In house, on the fly renderings have once again become a cost effective part of the design work flow!

  • Revit Tip: Easy Wall Poche

    This is the first of what is hopefully many more Revit Tips to come.  Something that I’ve seen in some projects I’ve worked on lately is using filled regions to poché walls and floors in section views.  DON’T DO THIS! Besides taking a large amount of time to initially create, filled regions are not going to update as you add or remove walls, windows, etc.  So how do you poché your walls?  Easy.

    Default Revit Sections Are Flat!
    Default Revit Sections Are Flat!

    There are two tools that you will use to make this happen, Visibility/Graphic Overrides and the Join Tool.

    I think the reason that you would try to used filled regions to poché walls is because you don’t fully understand how Revit displays objects.  Revit uses a hierarchy of graphic settings to determine what to display.

    On the most general level are the project’s Object Styles.  You reach these by going to Manage -> Settings -> Object Styles.  I could write a number of essays on what you can do here, but right now we will just focus on the Walls category.  The main walls category by default has 3 sub-categories.  For these 4 category/sub-categories you can set the line weights/color/pattern for projection and cut views as well as the default material.  This is where we could bump up the line weight for cut walls to make our elevations read clearer.

    (more…)

  • Emc2 Architects releases Keynote Manager 7.1

    (02/16/12 UPDATE: For aditional tips and tricks on keynotes check out Revit OpEd’s latest post Keynotes – Files, Tags and Legends)

    (04/03/11 UPDATE: Version 10.0 has been released.  For the latest information visit the project homepage at http://keynotemanager.revolutiondesign.biz/)

    Emc2 Architects released Version 7.1 of their Keynote Manager software last Wednesday.  Keynotes in Revit are painful to manage, and the latest version of this Revit companion added automatic text casing and a direct link to the Windows’ Character Map from within the keynote editor dialog, as well as some nice interface modifications.  These minor additions and fixes feel like polish on what is already a powerful tool.

    Steven Faust, AIA, NCARBIn my opinion, this keynote manager, developed by Steven Faust at Emc2 Architects, is how keynoting should have been in Revit from the start.  By making the program “save as you go”, Steve has been able to allow multiple users to work on the same keynote file simultaneously.  Also, features like keyboard shortcuts, spell check, and a built in text search make managing keynotes easier than ever.  This program takes the mystery out of keynotes so that the end user doesn’t need to worry about the syntax of the text file.  The program makes it much easier for project managers, who aren’t familiar with the .txt file syntax, to make corrections to keynotes, and for BIM managers to create keynote templates that are readily available through the interface.

    The one problem the program doesn’t solve is the need to reload the keynote file in the Revit project for the changes to take effect.

    You can download the Keynote Manager from Emc2.  For the latest on the Emc2 Keynote Manager, see this thread on the AUGI forums.

    Screen shot of the main window
    Screen shot of the main window

    (more…)

  • Batch Rendering in Revit

    One of the newest Revit blogs to hit the Internet is Buildz by Zack Kron.  Zach does a really good job exploring the art of modeling complex parametric shapes in Revit.  I love going to his site to see what interesting things he’s creating.

    A recent surprise on his blog, a few days ago, was the release of a basic script for performing a batch render in Revit 2009 and Revit 2010.  Using the script feels like you’re doing some weird voodoo but it gives me hope that we will soon have this capability available to the masses with an easy interface.  I don’t think Zach is a trained programmer so even though the script is a bit tricky to use I have to applaud his being able to put something like this together.

    If there are any programmer/Revit users out there I would encourage you to take Zach’s script to the next level… or maybe Autodesk can include this function in Revit 2011?  Hint Hint.

    Download Zach’s Revit Batch Render Script and give it a try!

  • Bring Your 3d Models to Life!

    One feature of Autodesk’s Revit Architecture that I really have a lot of fun with is the ability to create fly/walkthrough animations.  Revit’s built in Walkthrough tool allows you to create highly complex animations involving multiple key frames moving the camera path in three dimensions and is an excellent tool for exploring your models with fairly high quality output.

    The downside of Revit’s capabilities is that you are limited to animating your camera position.  This may be okay for most situations, but what if you want a car driving down the road, or the door to open as you walk through the doorway?  Well, luckily you have a lot of options.  If your work flow already includes doing your rendering in 3ds Max, then you can use the powerful tools in it. Of course there are a multitude of software platforms out there, Maya, iClone, etc. and there are also some free alternatives, TrueSpace, Blender, and Anim8or.

    (more…)